
nformation
Scheduler explained
Home Page information
Set Up Zone page information
Confirm Zone page information
Schedule Page information
 |
Go back to scheduler |
Go to scheduler
|
|
 |
The videos above are best viewed in "full-screen" mode.
Welcome
Welcome to the Sacramento Region's Smart Irrigation Scheduler. This tool will create an irrigation
schedule with weekly run times, based on current weather conditions. It is offered free of charge,
and covers the Sacramento Region only. This tool is brought to you through the generous support of
the Water Forum.
Learn more about who brings this wonderful free app to you.
This irrigation scheduling app uses the zip code of the property to access current weather values from the CIMIS website. See CIMIS description below. It also uses the ETo (weather data) of the city for the property to generate a schedule based on historical weather values. A current watering index is also provided, for those who have irrigation controllers with a "Season Adjust" feature. See watering index below.
The app also takes into account any watering day restrictions of the water district for the property. If you are unsure as to what your water restrictions are, a link is provided to the BeWaterSmart.info website.
This app may be used to generate a peak schedule for smart controllers that require this. If you are not using this app in July (peak month for irrigation in most areas), you will need to click the "See schedule" link on the schedule page of the app. This will reveal the schedule for each month of the year, based on historical weather data. See watering index below for an explanation of this, and a list of smart controllers to use with this app.
The historical irrigation schedule may also be used to program controllers for every month of the year, in one fell swoop. This requires that the controller have a "percent adjust" feature. If all 12 months are programmed at the same time, it is highly recommended that a rain sensor be connected to the controller, to turn the controller off when it rains enough to warrant it.
How accurate is this tool?
|
|
|
How accurate is this tool?
Because of the immense variability of design and installation of irrigation systems, as well as the diverse
array of emission devices available for residential sprinkler and drip systems, it is difficult to calculate
an irrigation schedule that is highly accurate. For the sake of clarity, simplicity, and ease of use, defaults have been
selected to represent the many variables used in this tool.
The schedule that is generated by this tool is meant to be used as a starting point. We recommend you follow these guidelines when using this tool:
- Program each zone according to the number of minutes recommended per week
- Watch the plants or lawn for signs of stress, and adjust the minutes accordingly
- Turn off the controller if it rains, or if the soil is not dry enough to warrant watering
- Change your irrigation schedule monthly, at a minimum, to avoid water waste and to respond to the changing needs of your landscape
How is drip handled?
|
|
|
How is drip handled?
Drip irrigation can be radically different in its application rates from property to property. Because of the
diversity of drip parts available, there is no standard by which it is designed and installed. If a drip system has not
been designed with either a uniform coverage rate, or a placement of emitters for each plant based on its size
or water-use value, any recommendation of how long to run a drip zone is a rough estimate at best.
Drip parts and components that are available for sale are very diverse. There are many, many sizes of tubing and configurations of setups that are possible. In the tubing alone, you could have 1/8", 1/4", 3/8", 1/2", 5/8", or 3/4" tubing. The emitters can have flow rates between .25 gph (gallons per hour) and 6 gph. There are also devices available that spray water in patterns similar to sprinklers.
If the zone you are scheduling is a drip zone, you will choose only one of the drip components offered. See below how to handle your choices if your drip zone is mixed with two or more different devices.
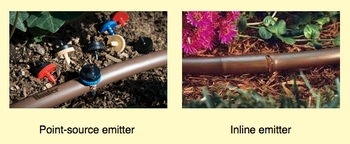
For this tool, the choices of drip components are from four basic categories:
- Devices that "drip" that the user installs
- Devices that "drip" that come built into the tubing
- Devices that "spurt" or spray water a short distance
- Devices that "spray" water at least two feet
The above categories have been assigned the following names:
- Point-source emitter
- Inline emitter
- Shrubbler
- Microspray

What if my drip zone has devices that don't match the pictures of the choices?
There are many different devices available for creating "drip" systems. To avoid making the user of this tool choose from 30
different devices, we have distilled the choices into the four described above. It is likely that you will have devices in
your system that don't exactly match the representative photos. We suggest you keep the descriptive language about the method of water
delivery in mind when you are deciding on which device to choose to represent your device. It should be easy to determine
whether things "drip," "spurt," or "spray."
What if my drip zone has more than one type of irrigation device?
Mixing devices that have different application rates within an irrigation zone
results in uneven application of water, and the scheduling of such a zone cannot be determined. For this reason, it
is strongly recommended that you strive to have only one type of emission device in each irrigation zone.
If you have a mixed zone, the first and best option is to redesign the zone to have only one type of
device. Here is a good rule of thumb for deciding what type of device to use:
Sprinklers are best for the lawn, and planted areas should be dripped. The drip for the plants should be some type of
emitter. In other words, you want the device to drip, not spurt or spray. The devices that spurt or spray apply the
water at a rate that most soils are unable to absorb, resulting in runoff.
If you need to create a schedule for a drip zone with different types of devices, choose the device that has the fastest application rate. This will minimize water waste that results from mixed-device zones. For example, if you have microsprays and some type of emitter in the same zone, choose microspray for this tool. If you have shrubblers and emitters in the same zone, choose shrubbler for this tool. See application rates
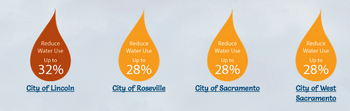
City, zip code, watering restrictions
|
|
|
Why choose a city? It is required that you choose the city the site is in because the historical weekly run time schedule is generated using historical weather values based on the city.
Why choose a zip code?
It is required that you choose a zip code because the weekly run time schedule that is based on current
weather conditions is based on the zip code of the property.
To see the zip code list, sorted by county, then by city, use the following link:
zip code list
This image from: www.BeWaterSmart.info
What about watering restrictions?
Most cities in the Sacramento region have mandatory water restrictions in place. The BeWaterSmart.info website provides links to all water districts in the Sacramento region. You can click on the water district link to go to its website to find the latest restrictions.
Zone setup page
|
|
|
Zone data for creating a schedule
The following choices are available for entering the data for each irrigation zone:
- Zone number
- Plant material
- Exposure
- Wind
- Slope
- Soil
- Irrigation type
Zone number, plant establishment
|
|
|
Why choose a zone number?
In the single-zone version of the scheduler, choosing the zone number is optional.
In the multi-zone version, choosing the zone number is important for keeping the zones straight, and being able to save all the controller data to the database.
Choosing plant material
Plants established or not?
The first thing to determine is whether this zone is made up of new plantings, or if it is "established." How do you know whether the plants are "established?" Plantings are considered "established" after they have lived through at least two growing seasons. These growing seasons would be spring and summer for non-native plants and typically late fall to spring for California natives. So basically, new plantings would be considered "established" after a year.
If it is determined that the zone's plants are not yet established, the zone would need to be watered as if the plants were high-water-use plants, regardless of their water-use-value. (Source: UC Davis horticulturists.) This would mean that you would need to choose either "lawn" or "Cool season turf" as the plant material on the zone setup page. This would ensure that the plants are watered correctly while getting established.
If it is determined that the zone's plants are established, you may choose the plant type that is truly represented in that zone, whether it be low-water-use plants, moderate-water-use plants, or mixed plants. The category "Mixed Plants" means mixed water uses in one zone. For example, this would be a zone that has low-water-use plants and moderate-water-use plants. Avoid mixing plants that are far apart in water needs, such as low-water-use plants and high-water-use plants. Click this link to read about the UC Davis plant trials research that supports this recommendation.
If the zone is a new lawn (either seed or sod), a different watering regime will need to be applied. Follow the watering instructions provided with the product. Check with your city or water provider before considering a new lawn, especially during times of drought, to learn about possible temporary guidelines.
Plant material
|
|
|
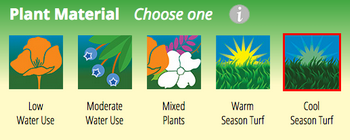
Plant material choices
One of the main factors that goes into determining how much water plants and turf need is the water-use value of that plant material. The other two are exposure (sun, part sun, and shade) and wind. The water-use values come from the WUCOLS (Water Use Classifications of Landscape Species) list, which is a rich resource unique to California.
You can learn more about the WUCOLS list - how and why it was created - at the official website for WUCOLS: http://ucanr.org/sites/wucols. A searchable database tool can be found on the site.
It's highly recommended that you become aware of the water-use values of all the plants in your garden. This will make it easier to create and maintain a water-efficient landscape, in which plants are grouped and watered according to their water needs.
Click the following link to go to the www.WaterWonk.us searchable WUCOLS database website to look up the plants in your landscape. If you are not sure of the botanical names of the plants in your garden, you could hire a landscape designer to identify all the plants in your yard. Landscape designers are plant experts. Not only can they identify your plants, but they can also give you expert advice on how to care for them. If you would like to find a landscape designer in your area, go to the APLD (Association of Professional Landscape Designers) website, and enter your zip code in the "Find a Designer" tool.
Low-water-use plants are plants that are classified as very low and low in the WUCOLS list. They are plants that are usually native to either California, or other dry and Mediterranean-type climates around the world. Don't assume that because a plant is native to California, that it is a low-water-use plant. There are many California native plants that are adapted to wetter areas of the state, and are native to plant communities that have a regular supply of water.
As mentioned above, the WUCOLS list is the best resource for getting accurate information about the water-use value of landscape plants. Low-water-use plants have been assigned a default value of .2 in this tool. This is the value in the formula that is used to determine the amount of water a zone requires.
Some of the telltale characteristics of low-water plants are as follows:
- Small leaves
- Hairy leaves
- Gray-colored leaves
- Leaves that rotate away from the hot sun like louvre blinds
- Leaves that are thick and fleshy that store water inside (e.g., succulents)
Moderate Water Use
Moderate-water-use plants are plants that are classified as moderate in the WUCOLS list. They can be plants that come from dry and Mediterranean-type climates of the world. They are classified as moderate because they are adapted to areas with a more regular and reliable water supply than low-water plants.
Moderate-water-use plants have been assigned a default value of .5 in this tool. This is the value in the formula that is used to determine the amount of water a zone requires.
Mixed Plants
Mixed plants are plants whose water-use values are mixed within the zone. For instance, you may have some low-water-use plants, and some moderate-water-use plants. For optimal water efficiency, it is best to have a zone with plants of only one water-use value, like low-water-use plants. But if you must have a zone that is mixed, it is highly recommended that there be no more than two different water-use values.
Zones with mixed plants have been assigned a default value of .5 in this tool. This is the value in the formula that is used to determine the amount of water a zone requires. Even though these zones have two (or even three) water-use values, we are treating them as if they were moderate-water-use zones.
Warm Season Turf
Warm season turf is a type of turf grass that is more robust during the spring and summer, and goes
dormant during the fall and winter. A sure way to know if you have a warm season turf, is if your lawn turns light brown
or yellowish in the winter. Often, a lawn will unintentionally have warm season turf species mixed in, along with the
cool season grass. This is because some of the grassy weeds are warm season grasses.
- Bermuda
- Kikuyu
- Buffalo Grass
- St. Augustine
- Seashore Paspalum
- Zoysia
Warm season turf requires less water than cool season turf, and a plant factor of .6 is used to represent this grass in this app.
Cool Season Turf
Cool season turf is a type of turf grass that stays green all year. It is by far the most common type of grass in Northern California. Tall Fescue and Bluegrass are the most common types of cool season turf, and most of the common sods available contain various percentages of each.
The cool season grasses include:- Tall Fescue
- Bluegrass
- Bentgrass
- Ryegrasses
Cool season turf represents the highest water use of all of the plant choices, and a plant factor of .8 is used to represent this grass in this app.
Exposure
|
|
|
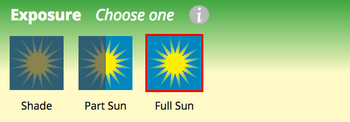
Choosing exposure
Whether the plants or lawn are in shade or sun plays a part in the amount of water they need. The three choices are shade, part sun, and full sun. If shade is chosen, the plant factor is lowered by 50%. If part sun is selected, it is lowered by 30%. If full sun is selected, the plant factor is not adjusted.
It is recommended that if there are circumstances that exist that would create more water loss from the plants, e.g., concrete or asphalt or a hot, south-facing wall of a nearby structure, that you watch the plants or lawn carefully, and adjust the run-time of the sprinklers as needed.
Following are the adjustment factor values used by this tool for exposure:
- Shade: .5
- Part Sun: .7
- Sun: 1.0
Wind
|
|
|
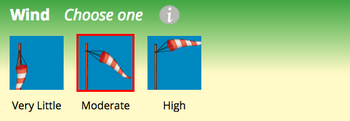
Choosing wind
Plants that are subjected to wind dry out more quickly than those that are not. For this reason, the amount of water is affected by the choice made for the presence or the absence of wind. The choices are very little, moderate, and high wind. If very little is chosen, the amount of water is not affected. If moderate is chosen, the plant factor, and thus the amount of water, is increased by 10%. If high wind is chosen, the plant factor, and thus the amount of water, is increased by 30%.
Following are the adjustment factor values used by this tool for wind:
- Very Little: 1.0
- Moderate: 1.1
- High: 1.3
Slope
|
|
|
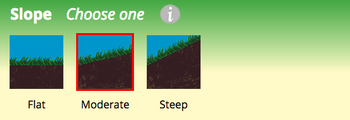
Choosing slope
If the zone is located on a slope, the ability of the soil to absorb the water is affected. Water tends to run downhill fairly quickly, depending on how fast it is being applied. It is very important to avoid run-off, which is what happens if the water is applied faster than the soil can accept it. If water is running off quickly with the existing sprinklers or drip, the best thing to do is to change the sprinkler nozzles or drip emitters for ones that apply water at a slower rate.
Sometimes, however, changing sprinkler nozzles or drip emitters is not an option. When we have sprinklers that apply
the water at a rate faster than the soil can absorb it, we can use a method that is known as "cycle and soak." An example of this would be:
We have sprinklers that, because of their fast application rate, cause the water to run off, after being on for 5 minutes. If our
schedule tells us to run the sprinklers for 10 minutes on a given day, we run this zone for 5 minutes. We allow a "soaking in"
period (one hour is fine), and then we run them again later for another 5 minutes.
Soil
|
|
|
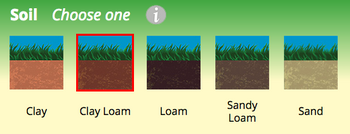
Choosing soil
Determining Soil Texture Based on Feel and Appearance
Sand
Sand is loose and single-grained. The individual grains can be seen or felt readily. Squeezed in the hand when dry, sand falls apart when pressure is released. Squeezed when moist, it forms a cast but crumbles when touched.Sandy loam
Sandy loam contains a high percentage of sand, but it has enough silt and clay to make it somewhat cohesive. The individual sand grains can be readily seen and felt. Squeezed when dry, sandy loam forms a cast that falls apart readily. If squeezed when moist, a cast can be formed that bears careful handling without breaking.Loam
Loam has a relatively even mixture of different grades of sand, silt, and clay. It is mellow with a somewhat gritty feel but is fairly smooth and slightly plastic or moldable. Squeezed when dry, it forms a cast that bears careful handling; the cast formed by squeezing the moist soil can be handled freely without breaking.Clay loam
Clay loam is a fine-textured soil that usually breaks into clods or lumps that are hard when dry. When the moist soil is pinched between thumb and finger, it forms a thin ribbon that breaks readily, barely sustaining its own weight. The moist soil is plastic or moldable and forms a cast that bears much handling. When kneaded in the hand, it does not crumble readily, but works into a heavy, compact mass.Clay
Clay is a fine-textured soil that usually forms very hard lumps or clods when dry and is very plastic or moldable and usually sticky when wet. When the moist soil is pinched out between the thumb and finger, it forms a long, flexible ribbon. Some clays, very high in colloids, are easily crumbled and do not retain a cast at all conditions of moisture.
Source: Drip Irrigation in the Home Landscape
Publication 21579
University of California, Agriculture and Natural Resources
See an excellent description with photos of soil types here. (Jain Irrigation USA)
Is the soil dry enough to water?
Hand-watering is the best way to water a garden. An automatic irrigation timer tends to call for irrigation to happen whether or not the soil is dry enough to warrant it. We highly recommend that you test the soil before irrigation, whether you are hand-watering, or leaving it up to the controller to know when to water.
For lawns, a good way to test the soil for readiness for irrigation is to push a screwdriver into the lawn. If it enters more than 3 inches, you don't need to water. If it doesn't, the soil is dry enough to water.
For planted areas, it's best that you dig into the soil several inches in areas where you know the roots are located. The best place to do this test is beneath the canopy of the plant, if possible. If the soil is warm and dry to the touch, you need to water. If it's cool and moist, you don't need to water.
Sprinklers – top row
|
|
|

Fixed spray
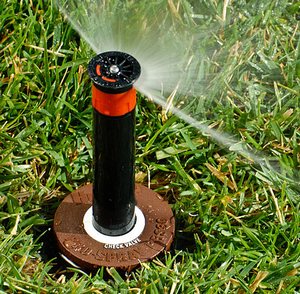
Photo courtesy
Hunter Industries, Inc.
The fixed-spray sprinkler is, and has been, the most common sprinkler. This type of sprinkler has been around for a very long time. These sprinklers are the ones that are the most likely to cause run-off, because they apply water at a very fast rate.
It is very important, if you have this type of sprinkler, to take measures to avoid run-off. Turn the sprinklers on when the soil is dry, and time how many minutes it runs before the water starts running off and away from the target area. Now you know what your maximum run time should be for this zone. You will need to "cycle and soak" this sprinkler zone. This means creating more start times, and spacing them apart at least an hour, if possible with your irrigation controller.
Single-stream rotor
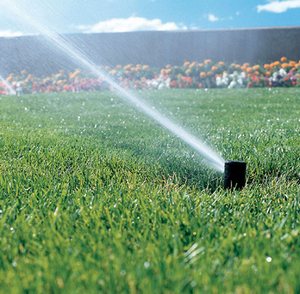
Photo courtesy
Hunter Industries, Inc.
Single-stream rotor is the generic term for long-range sprinklers. These sprinklers are
good for spraying long distances, as they will cover from 15 feet, up to 90 feet. Care must be
taken with these sprinklers, however, as they will not naturally apply water at a uniform rate between
sprinklers, unless they have been fitted with the correct nozzles. Mixing part-circle sprinklers
with full-circle sprinklers on the same zone will cause too much water to be applied in one part
of the zone, while another part receives too little water. Thus, these sprinklers are
best installed by a professional who understands the dynamics and functionality of matched
precipitation. Great amounts of water are wasted, if this isn't done.
This is another sprinkler that applies water at a fairly slow rate for the heavier soils
(loam, clay loam, and clay).
Toro Precision spray
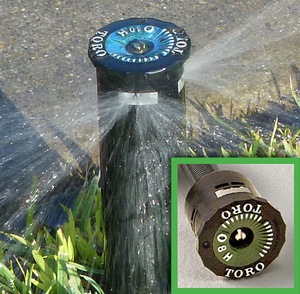
The Toro Precision nozzles are high-efficiency fixed-spray nozzles. They range in distance of spray from 5 feet to 15 feet. These nozzles may be retrofitted easily into existing sprinkler bodies to make a sprinkler zone at least 20% more efficient.
Sprinklers – bottom row
|
|
|

Rotary nozzle
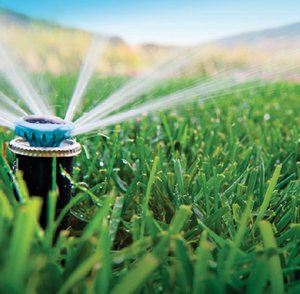
Photo courtesy
Hunter Industries, Inc.
Rotary nozzle is the generic term for sprinkler nozzles that emit fingers of spray as they rotate in a circular pattern. These nozzles tend to be at least 20% more efficient than standard sprinkler nozzles.
These nozzles apply water at a very slow rate. This makes them perfect for soils that have a low infiltration rate, as it gives the water a chance to enter into the soil. Other sprinkler nozzles that emit water at a faster rate, cause the water to run off before it can be absorbed by the soil. This type of nozzle is highly recommended for clay, clay loam, and loamy soils. It is important to note that the zones that have these sprinklers will need to run for a much longer time than the sprinklers with a high application rate, e.g., fixed-spray sprinklers.
The Hunter MP Rotator can easily be retrofitted into an existing inefficient
sprinkler. The water savings are great when inefficient nozzles are replaced with rotary nozzles.
The MP Rotators now come in spray distances of 5 feet to 35 feet.
The rotary nozzle pictured above is the Hunter MP Rotator.
See video
on MP 800SR (new short-range MPs)
Impact
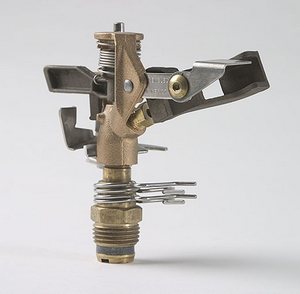
Impact sprinkler heads are an outdated type of head, and are becoming more and more rare in the landscape. Originally, these heads replaced the centuries' old technique of furrow irrigation in agriculture. They were meant to emulate rainfall. These sprinklers have a characteristic sound when they operate that we tend to associate with irrigation. These sprinklers can either be above the ground on fixed risers, or below ground level as pop-ups.
Brass
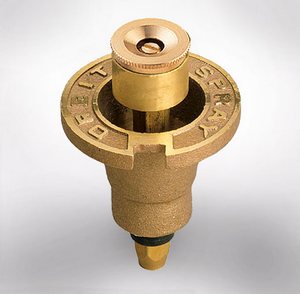
Photo courtesy
Orbit Irrigation
Products, Inc.
Brass sprinkler heads are an outdated design for irrigation. They are considered inefficient. They only pop up about an inch, so they're easily blocked by plant material. They also aren't engineered for efficiency. It's difficult to find specifications on these sprinklers, so that alone makes them unlikely candidates for modern irrigation systems.
Drip – top row
|
|
|
Point-source emitter
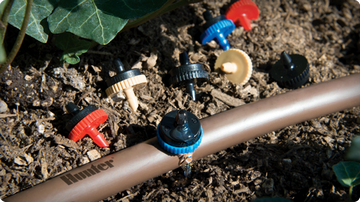
Photo courtesy
Hunter Industries, Inc.
Point-source emitters are trade jargon for the little button emitters that are purchased separately from drip tubing, and installed into or onto the tubing on the site. They are most commonly used with polyethylene drip tubing that is blank (has no built-in emitters). The flow rates that are used in residential landscapes are .5 gph and 1.0 gph. Higher flows should be avoided, as they are too high for the soil to absorb, in most cases.
The photo above shows point-source emitters that have been installed onto 1/2" diameter tubing. These emitters are also commonly used with 1/4" diameter tubing. This 1/4" tubing is also referred to as "spaghetti" tubing.
Point-source emitters are often chosen by irrigation installers because they are placed only where the plants can use the water. They are generally recommended in planted areas where the plants are widely spaced. Since these emitters are only applying water where the plants are located, they are seen as a strategy that conserves water by design.
The downside to this strategy of drip is that as the plants grow, more emitters need to be added to accommodate the spreading roots and structure of the plants. If the original one or two emitters are left in place as the only emitters for that plant as it grows larger, the plant will suffer. So care must be taken to expand this type of drip system, as the plants grow.
For this tool, point-source drip has been assigned a default application rate of .8 in/hr. The actual application rate can be anywhere from .2 in/hr to over 2 in/hr, depending on the number of emitters, the flow rate of the emitters, and the square footage of the zone. Therefore, we have decided on a rate of .8 in/hr, which is to be considered merely a starting point. Due to the immense variability of this method, the user is advised to start with the recommended schedule, and observe the plants closely to see how they are responding. The run-time minutes can be adjusted up or down, according to how the plants respond.
Inline emitter
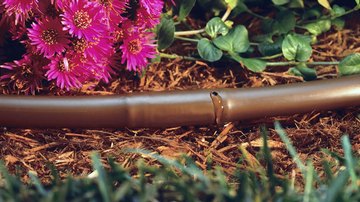
Photo courtesy
Rain Bird Corporation
Inline emitters are drip devices that have been pre-installed into tubing by the manufacturer. This type of emitter tends to be more reliable and durable. It is considered 90% to 95% efficient, since the water is applied directly to the soil. There also isn't anything that can break off or slip out of the tubing.
This tubing is also commonly called "emitterline." The emitters in this tubing are spaced in increments of 12," 18," or 24." The flow rates come in .25 gph, .4 gph, .5 gph, .6 gph, .9 gph, and 1.0 gph.
The use of inline emitter tubing is known in the trade as "line-source" drip. This is because the tubing is commonly installed in regular "grids" for even distribution of water to an area.
This type of drip is recommended when the area is densely planted. It's installed in a grid pattern on top of the soil in planted areas, and below ground, when underneath turf. When used under turf, it's referred to as "sub-surface drip."
When this tubing is used in regular grids, the uniformity of the coverage is very good. That is why the efficiency rating for this type of irrigation strategy is the highest of all irrigation types. This also makes it much easier to schedule and troubleshoot, since the grid lines are regularly spaced and predictable.
If it is not desirable to have the grid cover 100% of the area, grids can be installed where there are groupings of plants, with blank tubing (without emitters) connecting the grids.
Check out this excellent video on installing a drip grid.
Drip – bottom row
|
|
|
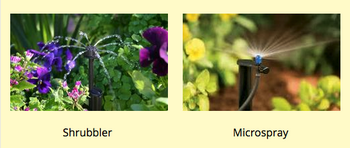
Shrubbler
Photo courtesy
Sprinkler MedX
Shrubbler is the generic term for low-pressure devices that "spurt" water. The rate at which they apply water is much faster than drip emitters, but much slower than microsprays. The most common variety of this type of device is shown in the photo above.
It isn't advisable to use this type of device with any type of soil but sandy soil. It applies water at a much faster rate than most soils can absorb, resulting in runoff. The only time it would be appropriate to use these with soils other than sandy soil, is when retaining basins are built around the plants to keep the water from running away. If used, they shouldn't be mixed on the same zone with any other type of irrigation, to avoid water waste.
Although considered to be extremely inefficient because of their tendency to break and/or blow apart, due to excessively high water pressure, they are still popular among irrigation installers. We have included them in this tool as a choice solely based on their popularity, and not their effectiveness.
If using these, care should be taken not to put too much of a strain on the hydraulic capacity of the zone. Because the flow rate is variable and usually adjustable, it is difficult to keep track of the total flow rate of the zone. More often than not, the maximum allowed flow rate is exceeded, resulting in a weak, low-pressure system that cannot water the plants properly. It's highly recommended to change out shrubblers for one of the drip methods described above.
Microspray
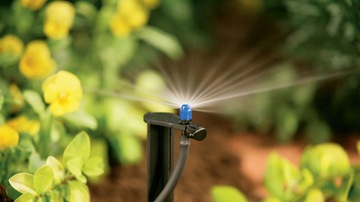
Photo courtesy
Orbit Irrigation
Products, Inc.
Microspray refers to any device that is connected to a "drip" system, and sprays water a distance of at least two feet. Drip systems are supposed to be low pressure and low volume. Microsprays are neither. The main reasons they have been mistakenly classified as "drip" is because they can be connected to a drip system, using 1/4" tubing, and their flow is measured in gallons per hour.
With virtually the same flow rate as "high pressure" sprinklers, microsprays should be classified as sprinklers, not as drip. Great care should be taken, when using microsprays, not to mix them with any other irrigation type on the same zone, to avoid water waste.
Microsprays are considered, like shrubblers, to be an inefficient method of irrigation. It is not advisable to use them with any soil type but sandy soil. It is highly recommended to change out microsprays to one of the drip methods listed above wherever possible, when used in planted areas.
As with shrubblers, we have included microsprays in this tool, based on their commonality, and not their effectiveness. Their propensity for causing runoff effectively eliminates them from being recommended in water-efficient landscapes.
Confirm zone page explained
|
|
|
Current weather data (for professionals and those who want more detailed information)
On the Confirm Zone page, we have provided a way to view the current weather data. This data includes:- The dates of the past 7 days
- ETo for each of the past 7 days
The ETo for each of the past 7 days is provided so that warming and cooling trends may be observed and noted. - Current weekly ETo
This is the weather value upon which the current weekly schedule is based. - Normal weekly ETo for this month
Comparing this number with the current weekly ETo value shows whether this is a normal year or not. - Peak weekly ETo
This is the historical mid-July ETo value for the city of the property. - Today’s watering index
See explanation of watering index below.
Current schedule, CIMIS
|
|
|
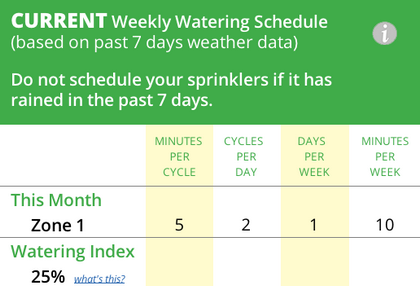
Current Schedule
The current schedule is based on the past 7 days of realtime weather data. The program goes out and retrieves this data from the CIMIS (California Irrigation Management Information System) website.
What is CIMIS?
CIMIS is a program of the Water Use and Efficiency Branch, California Department of Water Resources (DWR), that manages a network of more than 145 automated weather stations in California.CIMIS was developed in 1982 by the DWR and the University of California at Davis to assist California’s irrigators with managing their water resources efficiently. This service is available to all, and it is great information for Californians to keep themselves apprised of the weather, as it happens. Go to CIMIS website
Schedule page explained
|
|
|
Rainy Season
What to do during the rainy season
November through March is the typical rainy season for the Sacramento region.
During these months, we customarily turn off our irrigation controllers. In a year when it is unseasonably dry,
you may want to use this scheduler to water the recommended number of minutes per week.
If there is a rain event that delivers at least 1/8" of rain, the plants and turf should be fine for at least a
week, with no supplemental irrigation. In this case, turn the controller off, and don't turn it back on, until
the soil dries out. (Refer to the section above, "Is the soil dry enough to water?")
Schedule page explained
|
|
|
Current Schedule Explained
Scheduling Recommendations
The scheduler suggests minutes per cycle, cycles per day, days per week, and minutes per week for each zone.
The number of days per week are governed by either your city's watering restrictions or the soil type. These
recommendations are based on the choices you made when entering the data for the zone, and the past week’s weather
data.
At times you may notice that a recommendation in the schedule does not correctly reflect the exact data you entered.
This is because the program is attempting to produce the best schedule it can, while taking many factors into consideration.
There is room for you to adjust the schedule as you see fit, based on your knowledge and experience. The recommended schedule
is a good starting point.
For example, you may be given a recommendation with very few minutes of run time, and what seems like too many cycles (start
times). The number of cycles is determined by the slope, the soil type, and the rate at which the water comes out of the
irrigation device. If it seems like too many cycles have been recommended, you may cut down the number of cycles, as long as
you make sure this doesn't result in runoff. Also, make sure that the minutes per cycle, multiplied by the cycles per day,
multiplied by the days per week, equals the minutes per week.
It is best to train the plants to be watered as infrequently as possible. When gardens are first planted, the plants need to
be watered more frequently. They also need more frequent watering in mid-summer (otherwise known as Peak Time).
The best way to know how frequently to water, in the absence of watering day restrictions, is to dig into the soil,
and check the level of moisture in the soil. Only water after the soil has dried out, after a few inches of depth.
Adjusting the Current Schedule
How do I adjust the schedule for my controller?
You may find that you need to adjust the current schedule that is recommended. One reason for this could be that your controller
doesn't have enough start times to be able to program the recommended number of cycles per day.
If you have to change the numbers, try to keep the same number of minutes per week.
Here is an example:

In this example, my controller only allows three start times (cycles per day). The recommended schedule is giving me four start times (cycles per day). We want to stay with 64 minutes per week, so we'll do the following:
- We know that 8 (minutes per cycle) x 4 (cycles per day) x 2 (days per week) = 64 (minutes per week)
- We still want the changed numbers to equal 64 minutes per week
- We want to change the cycles per day to 3
- 64 (minutes per week) ÷ 2 (days per week) ÷ 3 (cycles per day) = 11 minutes per cycle
So now the numbers have changed to:
We ended up having to add 2 minutes to the minutes per week because 64 is not evenly divisible by 3. The result is different, but acceptable.
Schedule page explained
|
|
|
Watering Index
What is a Watering Index?
A watering index is a comparison of existing weather conditions to peak weather conditions. It is also
known as a "seasonal adjust" value. Using a watering index is a simple way to adjust an irrigation schedule
frequently to respond to changing weather conditions.
Many smart controllers use this strategy to adjust their schedules on a daily basis. These
controllers require that you enter a peak (mid-July) schedule, and they compare the weather value to the peak
value, to come up with a percentage to adjust the run-time minutes for each zone every day. Some examples of smart
controllers that use a form of watering index are:
- Aqua Conserve (no longer in production)
- Hunter controllers (with Solar Sync add-on)
- Irritrol controllers (with Climate Logic add-on)
- Irrisoft Controller Link
- Rain Bird ET Manager
- Rain Master Eagle-i
- Toro Evolution (with Smart Connect add-on)
- Weathermatic SmartLine series
Why is the Watering Index included in this scheduler?
The watering index is included in this scheduler for those people who have controllers with a "season adjust"
feature.
Follow these instructions to use the watering index:
1. Look at the historical schedule for this zone
2. Find the schedule for July (peak)
3. Enter this schedule into the controller
4. Find the "season adjust" feature on your controller, and enter in the watering index percentage value shown in the scheduling tool.
Depending on the month, you may want to adjust the number of days per week the schedule runs.
Schedule page explained
|
|
|
Historical Schedule
The watering schedule based on historical weather data is provided in case the current weather data retrieval is unsuccessful. It is also convenient to be able to see how this zone would be watered in any month of the year, rather than just the current month. This gives you a greater context as to how the water needs of plants and turf vary during different times of the year.
The historical schedule may also be used to create a base schedule for smart controllers that require that a peak schedule be entered. You may use the July (peak) schedule for this purpose. See list of some of the smart controllers that use this strategy.
Schedule page explained
|
|
|
Scheduling Algorithm
What plant factors are used?
Each of the plant categories has been assigned a default plant factor.
- Low Water Use: .2
- Moderate Water Use: .5
- Mixed Plants: .5
- Warm Season Turf: .6
- Cool Season Turf: .8
What are the factors for exposure?
Each of the exposure categories has been assigned a default value.
- Shade: .5
- Part Sun: .7
- Full Sun: 1.0
What are the factors for wind?
Each of the wind categories has been assigned a default value.
- Very Little: 1.0
- Moderate: 1.1
- High: 1.3
What are the precipitation (application rates) of the irrigation types?
Each of the irrigation types has been assigned a default value.
- Fixed Spray: 1.80 in/hr
- Single-Stream Rotor: 0.55 in/hr
- Toro Precision: 1.0 in/hr
- Rotary Nozzle: 0.40 in/hr
- Impact: 0.45 in/hr
- Brass: 1.50 in/hr
- Point-Source Emitter: 0.80 in/hr
- Inline Emitter: 0.80 in/hr
- Shrubbler: 1.50 in/hr
- Microspray: 2.50 in/hr
What are the intake rates of the different soil types?
Because the irrigation type of each irrigation zone needs to be aligned with the
intake rate (infiltration rate) of the soil, we take the soil's basic intake rate
into account when determining how long to run (cycle) the zone.
| Soil Type | Basic Intake Rate |
| Clay | 0.10 in/hr |
| Clay Loam | 0.20 in/hr |
| Loam | 0.35 in/hr |
| Sandy Loam | 0.40 in/hr |
| Sand | 0.60 in/hr |
How are cycles per day determined?
The number of cycles per irrigation day has been determined using a rating system based on the slope, soil type,
and precipitation rate of the irrigation device.
How is run-off handled?
We researched many of the irrigation controllers that are commonly used by the public for residential landscapes. This research
revealed that most controllers will only provide for either three or four start times per program. Because of this, we have
limited the number of cycles (start times) per irrigation day to four at the most.
The soil type, the slope, and the application rates of the irrigation components were taken into account in determining the number of irrigation cycles to allow in each irrigation day. Because run-off from irrigation systems is now illegal, and is currently being enforced more strongly, it is our goal to eliminate it completely. If you find that run-off results from the recommended schedule for any of your zones, adjust the run-times and/or the number of cycles accordingly.
Credits and resources
|
|
|
Funding Credits
This free scheduling app is brought to you by the generous support of the Water Forum. It is a collaborative effort among the Water Forum WaterForum.org, EcoLandscape California EcoLandscape.org, the Regional Water Authority BeWaterSmart.info, and WaterWonk WaterWonk.us.
Programming and Design Credits
Web and database programming, and irrigation algorithms by Lori Palmquist, CID, CIC, CLWM, CLIA, QWEL, Partner at WaterWonk.
Graphic design and user interface by Linda Brandon, Principal of Linda Brandon Design, Partner at WaterWonk.
Photo Credits
- Photos of Hunter sprinkler products, courtesy of Hunter Industries, Inc.
- The sprinkler photo at the top of every page of this site is the Hunter MP Rotator.
- Photos of the brass sprinkler head and the microspray, courtesy of Orbit Irrigation Products, Inc.
Resources
The following resources are available to help explain the process of providing the right amount of water to landscapes.
Complete zip code list
|
|
|
End of info page
|
|
|